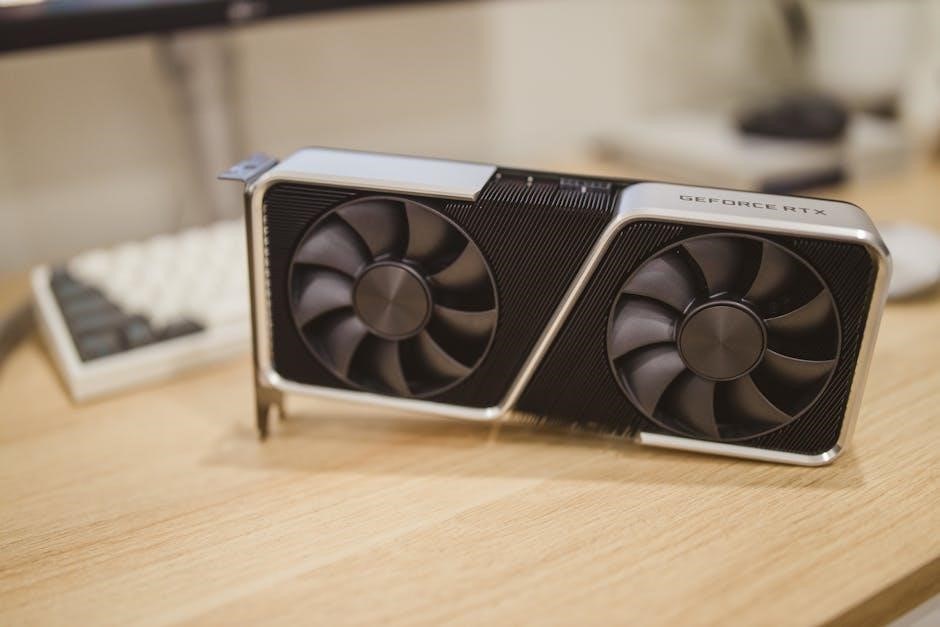
The Beech Lane RV Fridge Fan is a high-quality solution designed to enhance refrigerator ventilation in recreational vehicles. Its dual-fan system improves cooling efficiency, especially in warmer climates, ensuring optimal performance and extending appliance lifespan. Easy to install and compact, it’s a practical upgrade for RV owners seeking reliable and consistent cooling. The fan operates on 12V power, making it ideal for RV systems, and comes with all necessary hardware for a seamless installation process.
1.1 Overview of the Beech Lane RV Fridge Fan
The Beech Lane RV Fridge Fan is a dual-fan system designed to enhance ventilation in RV refrigerators, ensuring efficient cooling and reducing heat buildup. Operating on 12V power, it is specifically engineered for RV systems, offering a quiet and energy-efficient solution. The fan kit includes all necessary hardware for easy installation and is compact enough to fit seamlessly into the fridge vent. Its robust design ensures long-term performance, making it a reliable upgrade for RV owners. The system is particularly beneficial in warmer climates, where improved ventilation is crucial for maintaining optimal fridge performance and extending appliance lifespan.
1.2 Importance of Proper Ventilation in RV Fridges
Proper ventilation is critical for RV fridges to function efficiently and prevent overheating. Inadequate airflow can lead to reduced cooling performance, higher energy consumption, and potential damage to the appliance. Heat buildup, especially in warmer climates, can strain the refrigerator’s components, shortening its lifespan. The Beech Lane RV Fridge Fan addresses this by enhancing airflow through the ventilation system, ensuring consistent cooling and reducing the risk of heat-related issues. Improved ventilation also helps maintain consistent temperatures inside the fridge, preserving food freshness and overall performance. This makes it essential for RV owners, particularly those traveling in hot environments or during peak usage periods.

Tools and Materials Needed for Installation
Installation requires basic tools like a screwdriver, drill, and wire connectors. Materials include the fan kit, mounting hardware, and wiring, all designed for a straightforward setup.
2.1 List of Required Tools
To install the Beech Lane RV Fridge Fan, you’ll need a few essential tools. These include a screwdriver for removing vents and securing the fan, a drill for creating mounting holes, and wire connectors for safe electrical connections. Additionally, a measuring tape will help ensure accurate placement, and a pair of pliers may be handy for tightening connections. These tools are straightforward and commonly found in most toolkits, making the installation process accessible for DIY enthusiasts. Having all tools ready beforehand will streamline the process and prevent delays.
2.2 Materials Provided with the Beech Lane Fan Kit
The Beech Lane Fan Kit includes everything needed for a seamless installation. The package contains the fan unit itself, complete with dual fans for enhanced airflow. Mounting hardware, such as brackets and screws, is provided to secure the fan to your RV fridge vent; A wiring harness is also included to connect the fan to your 12V power supply. Additionally, the kit may include adhesive foam strips for a snug fit and vibration reduction. Comprehensive installation instructions are provided to guide you through the process. With all necessary components included, the kit ensures a straightforward and efficient setup for optimal fridge ventilation.

Safety Precautions
Ensure the fridge is turned off and power is disconnected before installation. Proper ventilation is essential for safe and efficient fan operation.
3.1 General Safety Guidelines
Always ensure the RV fridge is turned off and unplugged before starting installation. Proper ventilation is crucial to avoid gas buildup and ensure safe operation. Keep the area clear of flammable materials and avoid overloading electrical circuits. Never modify the fan or housing, as this could compromise safety and performance. Ensure all connections are secure to prevent loose wires. Avoid touching electrical components with wet hands. If unsure about any step, consult a professional. Follow all manufacturer instructions to maintain warranty validity and ensure a safe installation process.
3.2 Electrical Safety Considerations
When handling electrical components, ensure the power supply is disconnected to prevent shocks or short circuits. Use appropriate tools rated for 12V systems to avoid damage. Never splice wires without proper connectors, as this can lead to fire hazards. Ensure all connections are secure and insulated. Avoid overloading circuits, as this may cause electrical failure. Grounding must be checked to prevent malfunction; If unsure, consult a certified electrician. Follow all local electrical codes and manufacturer guidelines for a safe and reliable installation. Regularly inspect wiring for signs of wear or damage to maintain safety and performance.

Preparing Your RV and Fridge for Installation
Before installation, clean the fridge vents and ensure proper airflow. Check for blockages and verify the fridge is cool. Locate the ventilation system and power source.
4.1 Locating the Fridge Ventilation System
To locate the fridge ventilation system, inspect the exterior vents on your RV. These are typically found on the side or rear panels. Open the fridge compartment to identify the internal vent openings. Ensure the vents are clear of obstructions and debris. Proper identification of these vents is crucial for correct fan installation. Refer to your RV’s manual or manufacturer’s guidelines for specific locations. Once located, mark the area for easier access during installation. This step ensures the fan is mounted correctly for optimal airflow and cooling efficiency.
4.2 Ensuring Proper Power Supply
Before installing the Beech Lane RV Fridge Fan, ensure a stable 12V power supply is available near the fridge. Locate a suitable power source, such as a 12V outlet or wiring near the fridge controls. Use the correct gauge wire to connect the fan to avoid voltage drop. Install a fuse (e.g., 5A) to protect the circuit. Test the power source with a multimeter to confirm voltage and polarity. Proper wiring ensures safe and efficient fan operation. Refer to the fan’s wiring diagram for specific connections. A reliable power supply is essential for optimal performance and longevity of the fan.

Step-by-Step Installation Guide
Mount the fan to the fridge vent using provided hardware. Connect wires to the 12V power source and secure all components. Follow the manual for precise steps.
5.1 Mounting the Fan to the Fridge Vent
Begin by locating the fridge vent on the exterior of your RV. Carefully cut out the specified vent hole using a template or measurements provided. Gently place the fan into the opening, ensuring it aligns with the vent system. Secure the fan using the included screws and brackets, tightening firmly to prevent any movement. Make sure the fan is level and evenly spaced around the edges for proper installation. Double-check that all hardware is tightened securely before proceeding to the next step.
5.2 Connecting the Fan to the Power Source
Locate the 12V power source near your fridge, ensuring it’s suitable for the fan’s voltage requirements. Turn off the power supply before starting. Connect the fan’s wiring harness to the power source, following the provided diagram. Strip the wires if necessary and secure them to the correct terminals. Use electrical connectors to ensure a safe and stable connection. Double-check all connections to avoid short circuits. Once connected, turn the power back on and test the fan to ensure it operates smoothly. Proper electrical connections are crucial for the fan’s performance and safety.
5.3 Securing the Wiring and Hardware
Once the fan is connected, organize the wiring neatly to prevent tangles or damage. Use zip ties or adhesive-backed clips to secure the wires to nearby stable surfaces. Ensure no wires are pinched or stretched, and avoid routing them near moving parts. Tighten all hardware, such as screws or brackets, firmly but avoid overtightening. Double-check that all connections are secure and insulated to prevent electrical issues. Finally, verify that the fan operates smoothly and quietly before closing up the installation area. Properly securing the wiring and hardware ensures long-term reliability and safety of the fan system.

Testing the Fan After Installation
After installation, turn on the fan to ensure it operates smoothly, check airflow efficiency, and confirm low noise levels for proper function.
6.1 Turning On the Fan for the First Time
After completing the installation, switch on the power supply to the fan. Ensure the fan blades rotate smoothly and quietly. Check if the fan vent is clear of obstructions to allow proper airflow. Verify that the fan is drawing air through the vents and circulating it efficiently. Listen for any unusual noises, which could indicate improper installation or blockages. If the fan operates without issues, it’s ready to enhance your RV fridge’s performance. Proper functionality ensures better cooling and reduced strain on the refrigerator, especially in hot conditions.
6.2 Checking for Proper Airflow
To ensure proper airflow, inspect the fan’s intake and exhaust vents for blockages. Verify that air flows freely through the vents without resistance. Check for consistent airflow by placing your hand near the vents to feel the air movement. Ensure the fan blades are spinning evenly and not restricted. If airflow is weak, inspect for dust buildup or debris that may need cleaning. Proper airflow is crucial for efficient cooling and maintaining your RV fridge’s performance. If issues persist, refer to the troubleshooting section for further assistance.

Tips for Optimal Fan Performance
Ensure adequate ventilation by keeping vents clear, clean the fan regularly, and maintain a consistent power supply to maximize efficiency and prolong lifespan.
7.1 Ensuring Adequate Ventilation
To maintain optimal performance of your Beech Lane RV Fridge Fan, ensure proper airflow by keeping vents clear of obstructions. Regularly inspect and clean the ventilation system to prevent dust buildup, which can hinder air circulation. Make sure the fan is installed in a way that allows it to efficiently draw hot air out of the fridge compartment. Proper ventilation not only enhances cooling efficiency but also prevents overheating, which can damage the refrigerator or the fan itself. Additionally, ensure that the fan is positioned to maximize airflow, and consider upgrading to a dual-fan system for improved performance in warmer climates.
7.2 Cleaning the Fan and Vents Regularly
Regular cleaning of the Beech Lane RV Fridge Fan and ventilation system is crucial for maintaining its efficiency. Use a soft brush or compressed air to gently remove dust and debris from the fan blades and vents. Avoid using harsh chemicals or high-pressure washes, as they may damage the components. Clean the fan grille and surrounding areas to ensure unobstructed airflow. For optimal performance, inspect and clean the fan every 3-6 months, depending on usage. A well-maintained fan and vent system will enhance cooling performance and extend the lifespan of your RV refrigerator. Schedule regular cleaning to keep your fridge running smoothly.

Troubleshooting Common Issues
Common issues with the Beech Lane RV Fridge Fan include the fan not turning on or making excessive noise. Check power connections and ensure proper installation.
8.1 Fan Not Turning On
If the Beech Lane RV Fridge Fan fails to turn on, first check the power supply and ensure all connections are secure. Verify that the fan switch is in the “on” position and that the power source is functioning. Inspect the wiring for any signs of damage or loose connections. Ensure the fan is properly mounted and that no debris is blocking the vents. If issues persist, consult the installation manual or contact customer support for assistance. Testing the fan directly from the power source can help identify if the problem lies with the wiring or the fan itself.
8.2 Fan Making Excessive Noise
If the Beech Lane RV Fridge Fan is producing excessive noise, inspect for loose mounting screws or misaligned brackets. Ensure the fan is securely fastened to prevent vibrations. Check for dust or debris accumulation on the blades, which may cause imbalance. Clean the fan gently with a soft brush or cloth. Verify that the fan is installed on a level surface and that no obstructions are causing friction. If noise persists, refer to the installation manual for troubleshooting or contact Beech Lane customer support for further assistance. Proper maintenance and alignment are key to minimizing operational noise.

Warranty and Support Information
Beech Lane offers a comprehensive warranty and dedicated customer support for their RV fridge fans, ensuring peace of mind and assistance with any installation or performance issues.
9.1 Understanding the Beech Lane Warranty
Beech Lane provides a comprehensive warranty for their RV fridge fans, covering manufacturing defects and ensuring product reliability. The warranty period typically lasts for one year from the date of purchase and includes replacement or repair of faulty components. To maintain warranty validity, proper installation following the provided instructions is required. Customers can find detailed warranty terms on the official Beech Lane website or by contacting their customer support team. This commitment reflects Beech Lane’s dedication to quality and customer satisfaction.
9.2 Contacting Customer Support
Beech Lane offers dedicated customer support to assist with inquiries, troubleshooting, and warranty claims. Customers can contact the support team via email, phone, or through the contact form on the official Beech Lane website. For prompt assistance, it’s recommended to have product details and order information ready. The support team operates during standard business hours and typically responds within 24-48 hours. For urgent issues, live chat may be available on their website. Visit the official Beech Lane website for the most accurate and up-to-date contact information to ensure a smooth and efficient support experience.
The Beech Lane RV Fridge Fan enhances ventilation, improving cooling efficiency and extending appliance life. Its easy installation and effective design make it a valuable RV upgrade.
10.1 Summary of the Installation Process
The installation of the Beech Lane RV Fridge Fan involves mounting the fan to the fridge vent, connecting it to a 12V power source, and securing the wiring. Ensure proper ventilation by positioning the fan to maximize airflow, and follow safety guidelines to avoid electrical hazards. The process is straightforward, requiring basic tools like a drill and screwdriver. Once installed, the fan significantly improves cooling efficiency, especially in hot climates, and helps extend the lifespan of your RV refrigerator. Regular maintenance, such as cleaning the fan and vents, ensures optimal performance. This upgrade is a practical solution for enhancing your RV’s fridge functionality.
10.2 Benefits of Upgrading Your RV Fridge Fan
Upgrading to the Beech Lane RV Fridge Fan significantly enhances your refrigerator’s performance and efficiency. By improving ventilation, it ensures consistent cooling, reducing the risk of overheating and food spoilage. The dual-fan design maximizes airflow, making it ideal for hot climates. This upgrade also reduces the strain on your fridge, potentially extending its lifespan. Additionally, the installation process is straightforward, requiring minimal tools and expertise; The result is a more reliable and efficient cooling system, providing peace of mind during your RV adventures. This practical upgrade is a valuable investment for maintaining optimal fridge functionality and overall comfort in your RV.
References and Additional Resources
For further guidance, refer to Beech Lane’s official installation manuals and online tutorials. Additional resources include YouTube tutorials, RV forums, and the Beech Lane website for support.
11.1 Official Beech Lane Installation Manuals
Official Beech Lane installation manuals provide detailed, step-by-step instructions for installing their RV fridge fans. Available on the Beech Lane website, these manuals cover compatibility with various fridge models, wiring diagrams, and mounting procedures. They also include troubleshooting tips and safety guidelines. The manuals are designed to be user-friendly, ensuring a smooth installation process. For specific models like the 12V dual-fan system, the manual offers precise measurements and hardware requirements. Referencing these manuals is essential for a successful installation and to maintain warranty validity. Visit the Beech Lane website or contact their support team for the most up-to-date guides.
11.2 Recommended Online Tutorials and Guides
Beyond official manuals, several online resources offer valuable insights and step-by-step guides for installing Beech Lane RV fridge fans. Video tutorials on platforms like YouTube provide visual demonstrations, while blogs and forums share real-world experiences and tips. For example, popular RVing channels showcase how to properly mount and wire the fan for optimal performance. Additionally, websites like Amazon and RV forums often feature detailed installation stories and troubleshooting advice from users. These resources complement the official instructions, offering alternative perspectives and practical solutions to common challenges, ensuring a smoother and more confident installation process for DIY enthusiasts and RV owners alike.